


Photo by Rubaitul Azad on Unsplash
Visual Studio x Github / git-integration part 2
Basic git commands and how they are handled by the git-integration of Visual Studio


As promised in the first part, with this blog post I'll guide you through the basic git commands and how they are wrapped from the amazing git-integration of Visual Studio.
1. The git changes window
The main area to access most of the git features in Visual Studio is the git changes window, wich can easily be enabled via the menu. Just go to the top menu bar and click "view --> git changes" or hit "ctrl+0" + "ctrl+g".
By default you'll then find the window on the right hand side of your IDE next to your solution explorer. On the top you have access to the most common tasks like:
select the branch (currently master)
fetch changes from the remote origin ( your online github repo)
pull changes from the remote origin
push changes from your local repo to the remote repo
sync -> pull then push
I'll call the area below the commiting area. Here you can see
message box for commits
a list of uncommited changes
stashed changes

2. Fetch & Pull
git fetch
git pull
vs.

A good practice before starting your workday or pushing your code, is to check whether there are any code changes in the remote repo (origin) missing in your local repo(mostly master).
Therefore git provides you with two commands: fetch & pull.
The git fetch command checks if there are any changes in the remote repo not existent in your local repo. It will give you a quick overview of all found changes but won't apply them directly to your local repo.
In contrast git pull checks for changes in the remote repo and applies all the found changes directly to your local repo.
So if you want to know wich changes git pull will apply to your repo, just do a quick fetch before the pull.
Those two commands are accessible by the first two arrow-buttons of the git-changes window.

For demo purpose I added a home.component.css file on the remote repo in github which I now want to pull into my local repo.
As I want to know which changes will be pull into my repo I'll do a git fetch in advance.

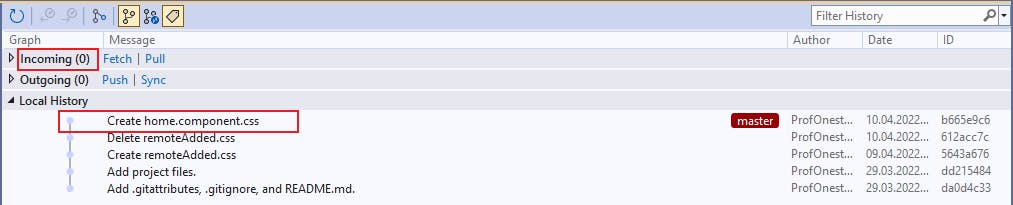
The GUI provides all the information about the remote changes. You can even right-click the commit and go into the details of the commit. I'll show your more of this feature later in the blog post.
After checking the changes simply hit "Pull" or click the arrow-down-symbol in the IDE and all the changes are pulled into the local repo. You can see that now the local history is up to date an there are no more incoming changes from the remote repo.
3. Commit and staged commit
git commit -m "commit message"
vs.

A commit a day keeps the bugs away... or at least keeps the reviewer motivated during a code-review.
Whenever you're coming to a point where a certain task in your code is finalized and cleaned up, you may want commit this changes to your local repo.
A commit is like a savepoint of your code. So in any time in history git allows you to easily go back to a certain state of your code, if you have done a commit.
As more and more commits will be done during development, it's good practice to decorate a commit with a message which describes the changes done within the commit. E.g. "bugfix xyz" or "added feature xyz".
In the demo project I added the reference to the new home.component.css in the home.cmponent.ts . Additionally I excluded the cache folder of the angular app from the repo by editing the .gitignore.
So the git changes window notices two local changes on the whole repo:
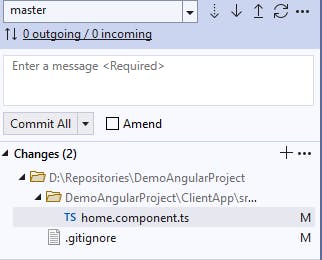
At this point both changes could be commited at once, but I'll use this state to explain the concept of staged commits.
Let's imagine you're working on the same repo with another developer and only want to commit and push the changes to the .gitignore at this point. So everybody is able to pull those changes in the .gitignore.
You don't want to commit and push the changes on the home.component.ts for now, because you're not done applying all the changes.
For those cases git allows you to do staged commits which are basically commits limited to certain parts of your changes. Just got to the changes window and for each change you want to commit just hit the "+" sign on the right to stage those changes. Staging in git basically means add this change to the next commit.
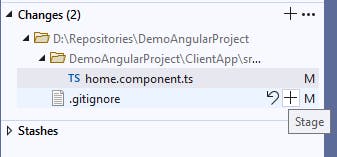
This results in a new section called "staged changes" and you're now able to commit only those changes in this section. So go ahead a create a meaningful message to decorate the commit.
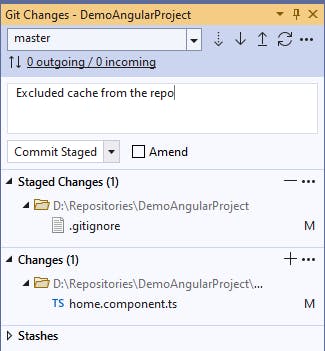
By finally clicking "Commit Staged" those changes get committed to your repo an can be pushed to the remote origin.
The IDE now shows us that we have one outgoing commit and still some uncommitted changes on the home.component.ts on the right. Which is exactly what we wanted.

4. Push
git push remote origin
vs.

To provide all of our fellow devs with the changes to the .gitignore we just go ahead and push those changes to the remote origin. For this just hit "Push" or click the arrow-up button on the IDE.
Finally all the changes of the commit are pushed to the remote repo.

Now we just went through the basic daily workflow with git. It's as simple as that.
5. Sync as a shortcut

By now you may have noticed the additional "sync" button which I already highlighted in the first overview-picture.
This feature basically combines the pull and push into one simple command. So anytime you click on "sync" or hit the rotating-arrows buttons git will try to pull all changes from the remote, apply them to the local repo and push all the local changes back to the remote.
6. Solving merge conflicts
Till now we just used the basic git commands you'll probably use everyday if you're using git. But for me, one of the most powerful features of the git-integration in Visual Studio is the ability to solve conflicts in your code visually.
What do I mean by conflict? Let's imagine I locally edited the `home.component.css as follows:
h1{
background-color: blue; //new
border: solid 1px green; //new
color:red;
}
and committed those change locally. (I didn't push them for now)
In the meantime someone working on the same repo also edited this css but with other parameters on the same lines within the css. In addition this colleague already pushed his changes to the remote repo.
As we finished our changes we naturally want to commit them to the remote repo. Just to make sure, we hit fetch in advance to see if there are any changes existent on the remote... and we see that there is already a change in the home.component.css incoming.

By right-clicking the commit we can open the commit details to get an side-by-side comparison of our local file and the incoming changed file:
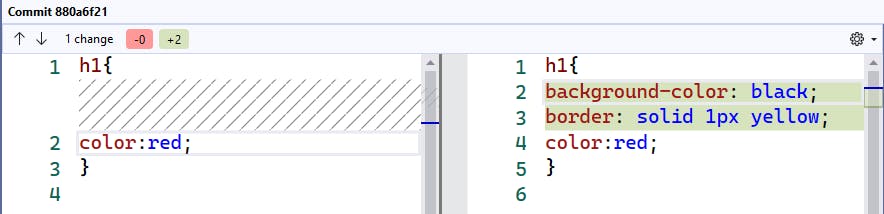
We just go ahead an pull the changes from the remote but as we did some changes on the same lines locally, git informs you that there are conflicts to be resolved.

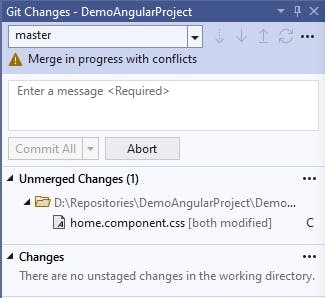
On the right-hand side you'll get a list of these unsolved conflicts, listed as "unmerged changes".
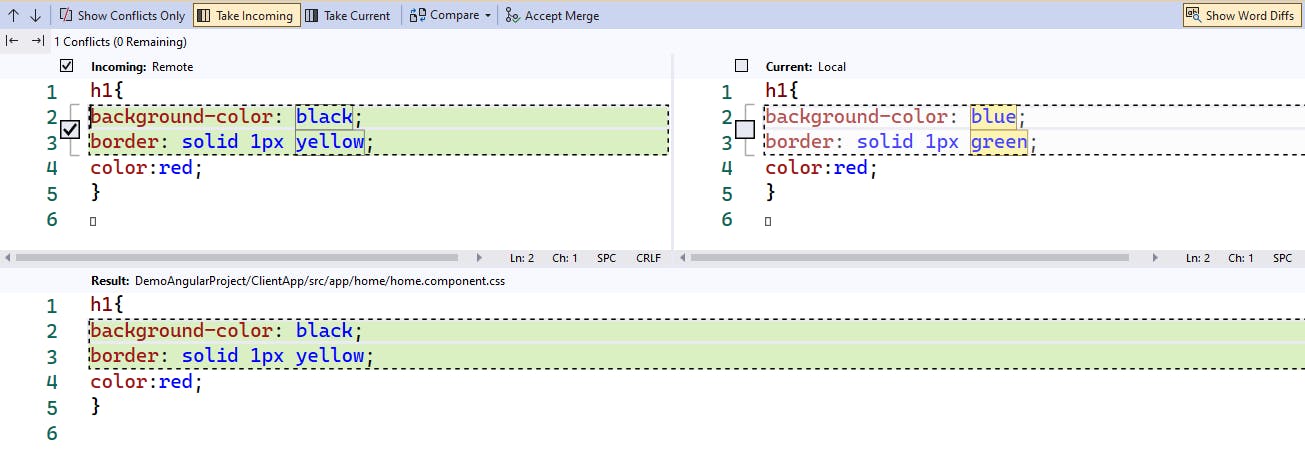
Just double-click the conflict and a new compare window will open up. On the top-left you see the incoming file and on the top right you see your local file. In front of the lines which lead to the conflict you find checkboxes that you can tick. On the bottom you see the resulting file, depending on your choice of how to merge the different changes.
There are three possible options:
#1. Accepting the incoming changes and dump the local changes (left side ticked)
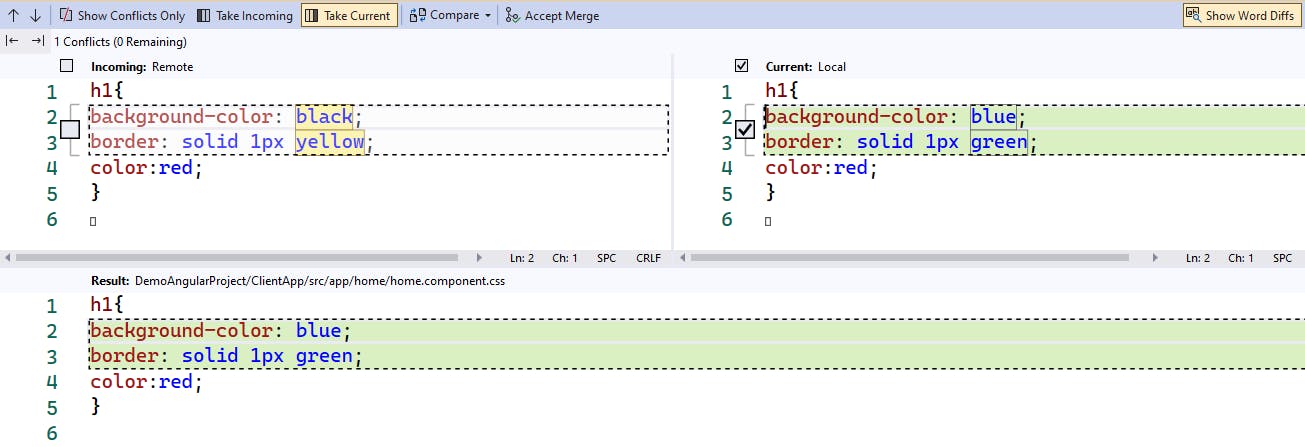
#2. Accepting the local changes and dump the incoming changes (right side ticked)
#3. Accepting both and merge them together
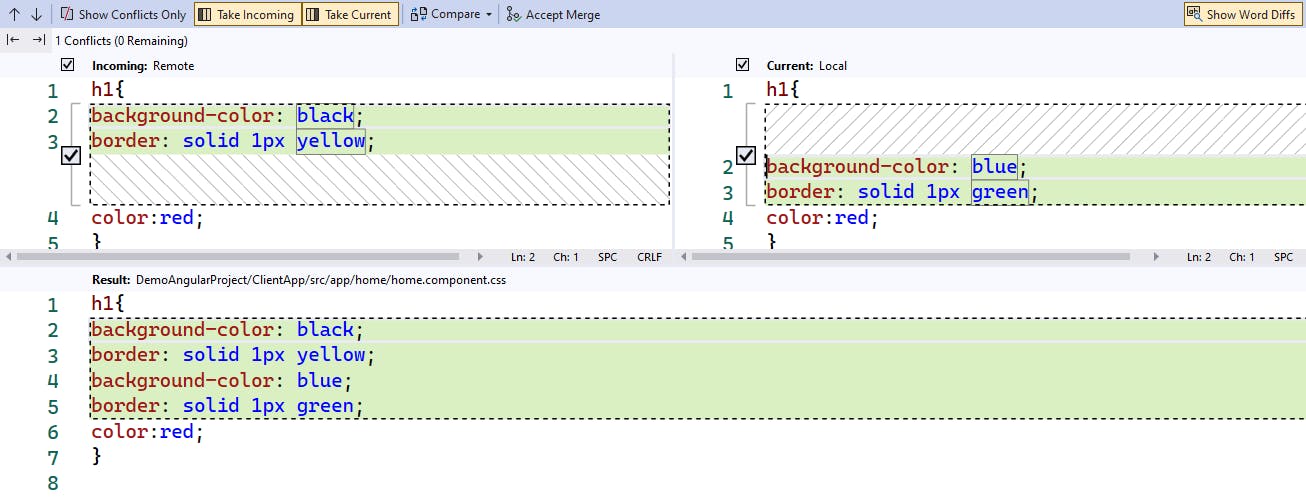
In this example the third option doesn't really make sense since we would have doublets of the properties background-color and border. So I decide to go with the incoming changes.
To apply the decision you only need to click "accept merge"
 This will create a new change (the merge) that needs to be committed to the history of the repo.
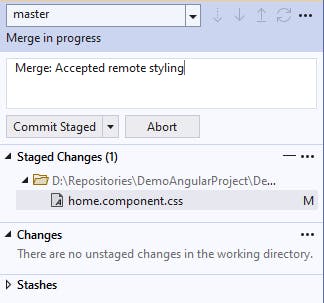
So again, provide a commit message and just click commit.
This will result in the following outgoing changes:
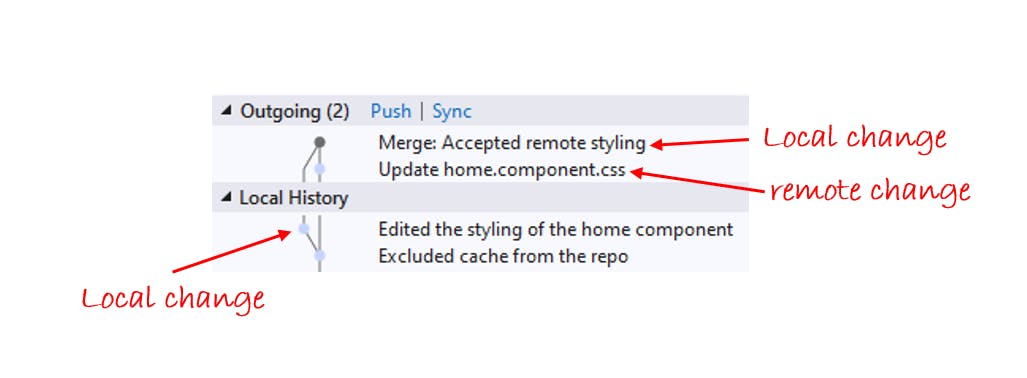
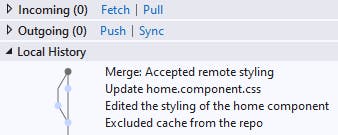
To provide this decision to everybody else just push it to the remote. The changes are then a part of the whole repo history:
7. Conclusion
As you may noticed the git-integration of Visual Studio gave us the possibility to access all of the git features without opening a git bash or command-line and typing any of the underlying commands by hand.
For the daily workflow this is such an amazing tooling that I never want to miss again.
I hope you were able to follow along.
Do you use Visual Studio with the git-integration on a daily basis? Or are you using a different IDE with similiar functionalities?
Feel free to share in the comments down below.
Thanks for reading!
git commit -m "Second part of git-integration in Visual Studio"